How to create an Ecommerce with Shopify

What is Shopify?
Are you willing to move your shop for your products? Then I have just the right platform for you that is Shopify.
Shopify is a Canadian scaleup established 10 years ago and now has become one of the leading ecommerce platforms designed for all types of businesses. Hundreds of thousands of entrepreneurs from over 175 countries trust Shopify to help sell their products. In our series about Shopify guide we will explain how to use Shopify to sell anything!
Let’s start!!
How to create Shopify account?
The initial step to every online platform is to create an account. Here is a stepwise easy process that you need to follow to get started with Shopify.
Step 1: Navigate to the Shopify website.
Step 2: Get to the start button, fill up your valid Email address, set a password, and chose a unique name for your shop.

Note- You need to choose a unique name for your shop or else Shopify so that “yourstore.myshopify.com” should be unique for each store.
Step 3: Click Next, update Shopify about your sales plan or if you are already into the sales business.

Step 4: Complete the process by clicking on the ‘Enter My Store’ button.

Step 5: Shopify will ask you if you’d like to make a brick and mortar store or an online shop. For the tutorial we’re only going to make an online shop, so select that option and click Next.
Step 6: Fill up your personal information like your name, address, and phone number, and complete the process of registration.
Navigation Tour in your Shopify account
While setting up your online store, you should first think and analyze how you want the customers to discover your store and the listed products as well as your business information. This will help you to make the proper decision about your online store navigation.
Wait!!
Before you begin, you should grab some knowledge about the default menu and themes that can be used for your shop.
Default Menus
Two default menus will appear on your online shop, one is the main menu and the other footer menu. The best part about Shopify is that nothing is fixed and everything can be edited, so you can add, remove, and edit items in your shop default menu.
Main menu
Starting with the main menu, it appears on every page of the setup online store. The main menu is displayed either as the items across the width of the header or like a list of items in the sidebar. Customers will look at your main menu to know more about your store and find the products listed in your shop. It is just like a general menu with the pages like ‘about us’ which is found on every website.
Further, your main menu has two default menus.
- Home: the main page of your online store
- Catalog: a page that displays all of your products
In addition to this, you can easily add a drop-down menu to the existing menu. A drop-down menu is a kind of sub-menu that comes dropping down from your main menu, it usually displays the items with are related to the main category above. Having dropped down menu is one of the amazing ways to organize your shop and the categories you have listed.
Footer menu
The other type of menu that is found in the shop is the Footer menu. The Footer menu is displayed as the list of items present across the width of the footer. The customer visiting your website will probably go to your footer menu to find the information and policies of your store; along with this, your contact details will also be present there.
Themes

Every theme has a different design and a different layout. Thus, the navigation will look different in all different themes. So, it is advised to try every theme to know the look of your shop.
How to add your products

Now of you have established your shop it is important to add up the products, after all the shop without products will look incomplete. So here are the steps you need to follow to add products in your shop
Step 1: From Shopify admin, go to the Products seen in main menu.
Step 2: A drop down sub menu will appear, select All products option in that.

Step 3: From the product page click on Add products option.

Step 4: A page will appear in which you have to fill up all the necessary details of the product.

Step 5: After filling up all the details Click Save.
How to change the theme of your store on Shopify

Everyone wants their shop to look perfect and amazing, and so shopify gives you an option for setting the theme of your shop. Here is how you can do that with your shopify account
Step 1: From home page, look at the main menu and click on the online store option.
Step 2: A drop down menu will appear. In that drop down click on Theme

Step 3: To change your Shopify theme, find the new theme in the “More Themes” section of the Themes page.

Step 4: At last click on Actions to Publish for your desired theme.

How to add a user to help you manage your shopify store
Sometimes it becomes really difficult for a single user to manage the shop online; after all it involves a lot of hard work and demands a lot of time. So, to make managing the shop easier for you Shopify gives you an opportunity to add up the user in your account that can help you to manage your shop. Here are the steps that will help you to add another user to your account.
Step 1: Go to settings in the main menu, settings page will appear.
Step 2: Click to Plan and Permissions.
Step 3: Go to Add Staff Account.


Step 4: Fill up the details and click to send invite to invite the user.

Step 5: An email will be sent to the person and then, that person can create a staff account and can get an easy access to the shop, they can manage products content & upload new products. They will not be able to change the Shopify plan or buy any apps or change payment methods
How to connect apps to help you sell & market for your Shopify store

Shopify is one platform that will also help you to add more apps to your store that will help you to promote your business on various other platforms. But, how you can do that? It is simple and involves some easy steps.
Step 1: Go to App option in the main menu and click on Visit the shopify app store
Step 2: Shopify will redirect the page to a Shopify app store. Login to the app store with your shopify account and search for whatever app you want to add to your shop.

Step 3: Go to the app you want to add, and click to Add App option to add the application to your account.
Step 4: Once you click to Add App option the webpage will be automatically redirected to your shopify account, scroll down and click to Add Sales Channel and your app will be added.
How to create a coupon

Discount coupons are always the best option to promote your business and attract more and more customers to your shop. But a lot of shopify users don’t know how to do so, so here are some easy steps that can be followed to easily create discount code.
Step 1: Go to the Discount option in the main menu
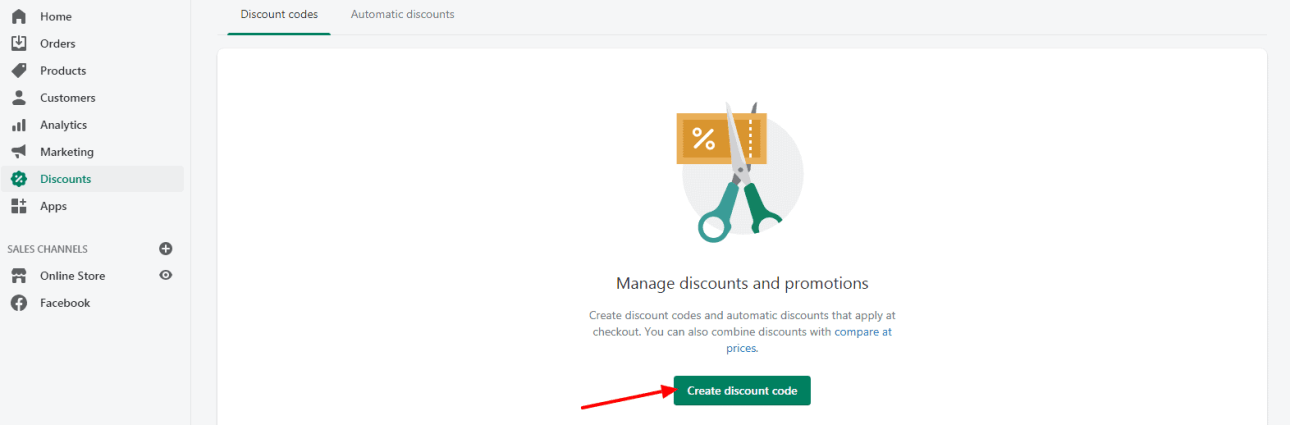
Step 2: Go to Create discount code
Step 3: Fill the Code you want and all the other necessary details, then click to save discount code.
This is how you can easily create a discount code and attract more customers to your shop.

Launching your shop for the public (for 29$ per month)
Before launching your shop you need to do some basic settings of creating a payment gateway, shipping and placing orders then only you will be able to make your store active. Shopify gives you a free trial for 14 days and then you have to select the appropriate plan for your shopify store to launch your online store.
This is how you will do it
Step 1: Go to settings and click on Plans and permissions
Step 2: Compare the shopify plans and select the plan best suited for your shop and buy it accordingly.
This is how you can buy the applicable plan and launch your own store online.

How to start advertising your product catalog
The most important thing one should take care of while running an online store is that the promotion of the store is really important and needs to be taken care of.
One of the major ways of creating promotions is to create a catalog and circulate it through to reach the maximum customer base. Here are some steps you can follow to make your own catalog.
Step1: Go to the Products option in the main menu and then click to Collections.

Step 2: Click Create Collection.
Step 3: Create the collections
Step 4: once you have set up your collection then In the Collection type section, select Automated


Step 5: Set the product condition Product price is greater than $0.
Step 6: Click save
Now you have successfully created a collection, in the product menu, you can easily add up the products to the collection and complete your catalog. If you select manually, then you can rearrange your products by using their drag and drop handles one by one, this is not recommended if your store has large number of products. If you want to change the title of your all collection, then you can edit it now that the collection has been created. It is important, however, that the handle of the collection remains set as all. You can confirm this by scrolling to the Search engine listing preview section and clicking Edit website SEO.
This is how you can work with shopify and create your own store. follow us to know more about adding products & connecting different sales and marketing apps to your store!
If you like us to create a Shopify store for you, contact us!
Related article: How To Start a Successful Ecommerce Business From Home: 11 Important Steps [2022]


